
WOOHOO!!!! I’m so excited for this day. I get to share my first crochet pattern that I designed!!!
Designing a pattern has given me a whole new respect for the crochet patterns I’ve done in the past. It takes a lot of planning, checking, and redoing to get it right! I frogged (ripped out the stitches) on the first square 4 different times just to get the measurement right.
This is my first time using the term frog. I recently joined several crochet groups on Facebook to see what other people are making and to get some inspiration and I see the term frog used quite often. Thankfully Google is my best friend! So I did some searching to find out where the term came from. FYI that frog means to rip out the stitches; “rip it, rip it” sounds like the frog croak.
Back to the blanket…

Inspiration for the design
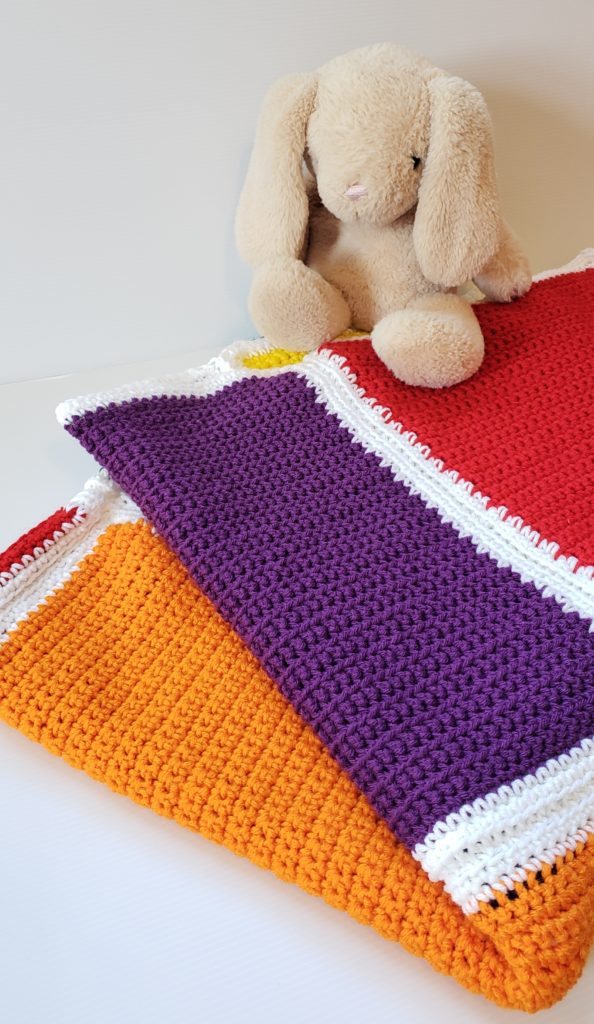
My inspiration for this pattern and the colors came from my daughter. She’s in school and has been using rainbow colors a lot with her art projects. It took me back to when I was her age and how I LOVED using rainbow colors. I was reminded of that first whiff of crayons after opening up a new box. She’s so excited that I’m doing a rainbow blanket that she asked if she could keep it!! ( of course she can!)

I had a lot of fun creating this blanket and picking out just the right colors to compliment each other and capture the rainbow. I played around with different stitches and layouts to bring alive the vision I had in my head.
I consider the pattern easy; it consists of a single crochet stitch and a front loop single crochet stitch. I’ve never done a front loop single crochet before. So when I first started out, I was doing the stitch backwards; I was starting at the back of the loop and coming through the front. BUT, the correct way to do the stitch is going from front to back on the loop closest to you.
Thankfully it only took a half row to figure out I was doing it wrong! And now I’m thrilled to share the pattern with you! Enjoy!

Also just wanted to let you know that if you want a printable PDF version of this pattern, you can purchase it on Etsy here.
Pattern Steps

Rainbow Toddler Blanket Pattern
Skill level: Easy
Materials:
Size: US I/9 (5.5mm) crochet hook or size needed to obtain gauge
Red Heart® “ Super Saver®” 7 oz / 198g; 364 yds/333m
1 Skein each: 319 Cherry Red; 254 Pumpkin; 324 Bright Yellow, 368 Paddy Green, 385 Royal, 776 Dark Orchid, 311 White
Notions: Yarn Needle
Abbreviations:
Approx = Approximately
Ch = Chain(s)
FLsc = Front Loop Single Crochet
Rep = Repeat
SC = Single Crochet
Sl st – Slip Stitch
St(s) = Stitches
Measurement:
Approx 38” x 68” (96.5cm x 173 cm)
Gauge:
SC: 14 SC and 14 rows = 4”/10 cm
FLsc: 13 FLsc and 12 rows = 4”/10 cm
Notes for Front Loop Single Crochet
Step 1: Insert your hook into the front loop of the stitch to be worked, coming up through the middle of the stitch.
Step 2: YO and draw a loop through the fabric.
Step 3: YO and draw through 2 loops on hook.
Pattern Instructions:
Single Crochet Squares (make 6 squares, one in each rainbow color)
FOUNDATION ROW: Chain 38.
ROW 1: Starting in the second ch from the hook sc, sc in every ch across, turn. (37)
ROW 2: Ch 1, starting in first stitch sc, sc across the entire row in each st, turn (37)
ROWS 3 – 51: Rep row 2 or until square measures 14”. (37)
FINISHING: Fasten off the yarn and weave in all the loose ends with a yarn needle.
Front Loop Single Crochet Squares (make 6 squares, one in each rainbow color).
FOUNDATION ROW: Chain 43.
ROW 1: Starting in the second ch from the hook sc, sc in every ch across, turn. (42)
ROW 2: Ch 1, SC in first stitch, FLsc in next 40 st, SC in last stitch, turn. (42)
ROWS 3 – 45: Rep row 2 or until square measures 14”. (42)
FINISHING: Fasten off the yarn and weave in all the loose ends with a yarn needle.
Border (2 rounds of white on all 12 squares)
Step 1: With White, make a slip knot and join yarn in any stitch in the top row of the square (last row you finished).
Step 2: Ch 1 (counts as first SC), sc in each st across until you have 1 st remaining on the top row of the blanket.
Step 3: (SC, ch2, SC) in the last st (making the corner).
Step 4: (side of square) SC in each row along the side.
Step 5: (bottom row) (SC, ch2, SC) in the 1 st (making a corner) then continue making SC in the bottom row until there is 1 st left. (SC, ch2, SC) in last st (making a corner).
Step 6: Rep step 4.
Step 7: (Top row) (SC, ch2, SC) in 1 st (making a corner) then SC until you reach your 1 st you made at the beginning of the round. Join with sl st in that chain.
Repeat Steps 2 – 7 to make another round of white. Weave in ends.
Finishing:
Block each square to measure the same size.
To join squares, use the sl st method to join the squares together.
Below is a diagram of how I put the squares together to make sure it alternated between single crochet and front loop single crochet squares.
| Yellow FLsc Square | Blue SC Square | Orange FLsc Square |
| Purple SC Square | Red FLsc Square | Green SC Square |
| Green FLsc Square | Orange SC Square | Blue FLsc Square |
| Red SC Square | Purple FLsc Square | Yellow SCSquare |
Notes for combining squares:
You will notice that there are a different number of rows for SC squares and FLsc squares, so the stitch counts are not all the same. The trick is keeping the seams as flat as possible by using stitch markers!
On the edges to be sewn, use stitch markers to note both the corners and the middle of the squares when laid flat. Use as many stitch markers as needed to make sure both corners line up evenly. No one will notice if you have to skip stitches but it is best to space them out along the length of the seam.
Permissions + Copyright:
Please do not publish or share this pattern as your own. You may make items to sell with this pattern. In exchange, please link back this post. Do NOT use my photos as your own sales photos.
I would love to get your feedback since I’m new pattern designing! Reach out with any questions or comments.
Have an phenomenal day!
Heather