
In the beginning the Cozy Country Throw crochet blanket gave me a run for my money when I was first designing the crochet pattern. I restarted the pattern at least 6 times (if not more). I have never used Bernat Blanket yarn and so it took some time to get used to it and to get the tension right. But the awesomeness of this yarn is how QUICK this blanket came together and how SOFT it feels once I figured it out, so it was definitely worth the effort!

Crochet Blanket Inspiration
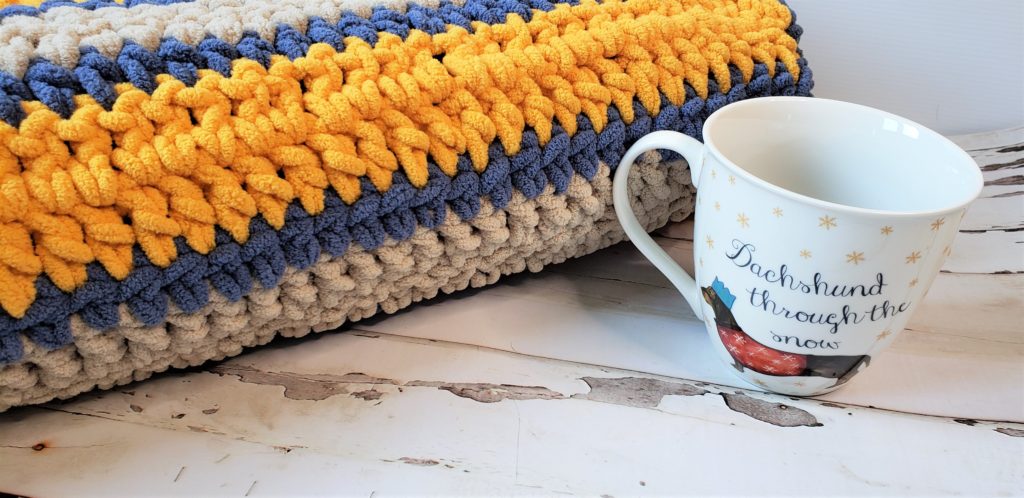
The inspiration for this crochet pattern comes from my years of watching Chip and Joanna Gaines redesign people’s kitchens into a country feel. I have ALWAYS loved the look of a country kitchen (and will have one some day). I envision myself sitting in a cute little breakfast nook with a view of the yard watching the birds wrapped up in this blanket and having a warm cup of coffee. To me that is a beautiful start to the day!
Coming back to the pattern….originally I was going to do a chevron pattern. But once I saw how it looked after a couple rows, I wasn’t feeling the design. So I ripped out (frogged) all the stitches except the foundation row and restarted over again.
And now I’m super happy with this new crochet pattern; it’s a mix of double crochet and half double crochet stitches with a single crochet for the border. So not only does it work up quickly but it has easy stitches as well.

Learnings along the way
First, I normally like to wrap the yarn around my left finger twice to help with tension. But with this yarn it kept getting stuck. So I tried wrapping it once and it worked perfectly. It kept enough tension that the yarn didn’t get hung up.
Second, for the half double crochet rows, the first chain 2 stitches do NOT count as the first stitch. I didn’t make that connection at first and my stitch count for each row was off. The problem was that I wasn’t counting the stitches for every row to make sure it was right. After my discovery, I ended up frogging six rows to correct it. Needless to say I learned my lesson and literally counted stitches in EVERY SINGLE ROW of this blanket as I was working it to make sure the stitch count was correct! 😉 I included the images below to indicate where the first half double crochet stitch goes in the row.


Third I learned that weaving in the ends of the blanket didn’t work so well with a yarn needle. When I tried to thread it, the yarn would pull apart. SO I switched to using a smaller crochet hook and that worked AMAZING!
And lastly when doing the border for the double crochet rows, I had 2 single crochets per row. For the half double crochet rows, I did 1 single crochet per row. I included the close up image below with the single crochet on the double crochet row.

Also I want to mention I did not block this blanket. It has definitely held up it’s shape throughout so there was no need.
Now onto the crochet blanket pattern!

You can see a free copy of the pattern below or if you’d like a PDF printable version of the pattern you can get it from my Etsy shop.
Pattern Instructions
CROCHET / SKILL LEVEL
Easy
MATERIALS
Size: US L/11 (8 mm) crochet hook
Bernat® Blanket™ 10.5 oz/300g; 220 yds/201 m
Color A: 2 balls 10830 Almond
Color B: 2 balls 10106 Country Blue
Color C: 2 balls 10918 Sunsoaked
Notions: Yarn Needle/or small crochet hook (to weave in ends)
ABBREVIATIONS
Approx = Approximately
Ch = Chain(s)
Dc= Double crochet
Hdc = Half double crochet
Rem = Remaining
Rep = Repeat
Sc = Single Crochet
Sl st – Slip Stitch
St(s) = Stitches
Yoh = Yarn over hook
MEASUREMENTS
Approx 45” x 56” (114.3cm x 142.2 cm)
GAUGE
7dc and 4 rows = 4” (10 cm)
PATTERN INSTRUCTIONS
Notes:
To join colors, work to last loops on hook of last st. Yoh with new color, draw through rem loops and proceed.
Blanket is worked lengthwise.
FOUNDATION ROW: With color A, Ch 92.
ROW 1: 1 dc in 4th ch from hook, 1 dc in every ch to end of row, turn. (90)
ROW 2: Ch 3 (counts as first st), 1 dc in second st and each st to end of row. Change to color B in last st, turn. (90)
ROW 3: Ch 2 (does NOT count as first st), 1 hdc in each st to end of row. Change to color C in last st, turn. (90)
ROW 4: Ch 3 (counts as first st), 1 dc in second st and each st to end of row, turn. (90).
ROW 5: Ch 3 (counts as first st), 1 dc in second st and each st to end of row. Change to color B in last st, turn. (90)
ROW 6: Ch 2 (does NOT count as first st), 1 hdc in each st to end of row. Change to color A in the last st, turn. (90)
ROW 7: Ch 3 (counts as first st), 1 dc in second st and each st to end of row, turn. (90).
ROWS 8 – 37: Rep rows 2-7.
ROW 38: Ch 3 (counts as first st), 1 dc in second st and each st to end of row. Change to color B in last st, turn. (90)
ROW 39: Ch 2 (does NOT count as first st), 1 hdc in each st to end of row. Change to color C in last st, turn. (90)
ROW 40: Ch 3 (counts as first st), 1 dc in second st and each st to end of row, turn. (90).
ROW 41: Ch 3 (counts as first st), 1 dc in second st and each st to end of row. (90)
FINISHING: Fasten off the yarn and weave in all the loose ends with a yarn needle/or small crochet hook. .
BORDER
STEP 1: With color B, make a slip knot and join yarn in any stitch in the top row of the square (last row you finished).
STEP 2: Ch 1 (counts as first sc), sc in each st across until you have 1 st remaining on the top row of the blanket.
STEP 3: [sc, ch2, sc] in the last st (making the corner).
STEP 4: (side of blanket) For the dc rows (almond and yellow), do 2 sc in each dc post and for the hdc rows (blue), do 1 sc in each st across the side of the blanket.
STEP 5: (bottom row) [sc, ch2, sc] in the 1 st (making a corner) then continue with sc in the bottom row until there is 1 st left. [sc, ch2, sc] in last st (making a corner).
STEP 6: Rep step 4.
STEP 7: (Top row) [sc, ch2, sc] in 1 st (making a corner) then sc until you reach your 1 st you made at the beginning of the round. Join with sl st in that chain.
REPEAT STEPS 2 – 7 to make another round of color B. Finish off and weave in ends.

If you like this crochet pattern and want to stay connected, sign up for my newsletter!